AMOGURU Knowledge Base
- Knowledge Base
- Google Docs
- Installation and configuration of the widget
Select the Google account that the integration will work with
Grant the amoguru application access to your disk data.
Close the window and you can start creating templates.
Prepare the template:
Create a document in Google Docs on your Google Drive.
Copy the sample agreement or invoice to it.
Edit the document to suit your needs.
Add masks (if necessary):
Insert masks into the text for automatic data substitution.:
- from the fields of the transaction, contact or company;
- standard masks (current date, time, etc.).
Save the template:
- Name the document clearly (for example, "Template Agreement").
- Leave it in a place convenient for you on Google Drive.
The integration can also work with products in Kommo.
To insert products into a document, you need to create a template for products:
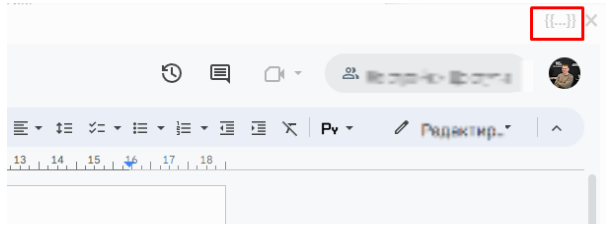
Open the document template editor.
-Click on the {{ icon...}} to access the list of fields.
Document number - the number that was specified in the integration settings in the “Last document number" field plus one.
For example, if 233 was specified in the field, then the template will have the number 234. If you submit the following document, it will already have the number 235, etc.
Date - the current date, for example - 18.10.2023
Date (number) - current day (number) - 18
Month (date) - current month (date) - 10
Month (row) - current month (row) is October
Year (date) - the current year (date) is 2023
Time (hours:minutes) - the current time is 17:22
*a mask with the “multilist” field type will not work
You can also use masks in the document name.
For example, if you want the document to have the name of the company for which the invoice will be issued and the invoice number, then you can write like this:
{{company_name}}, Account No.PR-A-{{doc_number}}
As a result, when invoicing, the document will receive the name:
LLC Company, Account no.PR-A-12
Where “LLC Company" is the company name in Kommo
“12” is the document number.
Check the automatic file organization:
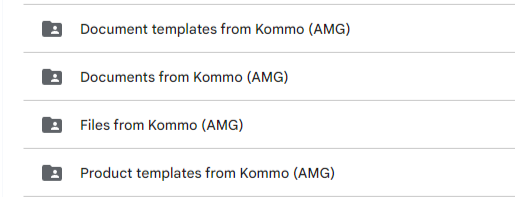
- After creating the first template, the integration will automatically create 4 folders on your Google Drive.:
- for documents;
- for templates;
- for files;
- for product templates.
The template is saved to the folder "Document Templates from Kommo (AMG)".
-The created documents are stored in the folder "Documents from Kommo (AMG)".
-The downloaded files are placed in the folder "Files from Kommo (AMG)".
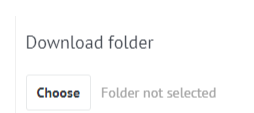
-You can change the folder for uploading files by selecting the appropriate folder in the settings.
In the modal window, select the required additional field.
-Copy the field (by clicking on it).
-Paste the copied field into the appropriate place of the template.
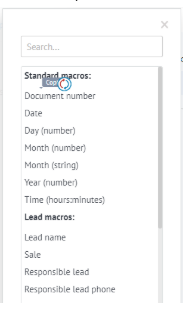
Document number - the number that was specified in the integration settings in the “Last document number" field plus one.
For example, if 233 was specified in the field, then the template will have the number 234. If you submit the following document, it will already have a number of 235, etc.
Date - the current date, for example - 18.10.2023
Date (number) - current day (number) - 18
Month (date) - current month (date) - 10
Month (row) - current month (row) is October
Year (date) - the current year (date) is 2023
Time (hours:minutes) - the current time is 17:22
*a mask with the “multilist” field type will not work
You can also use masks in the document name.
For example, if you want the document to have the name of the company for which the invoice will be issued and the invoice number, then you can write like this:
{{company_name}}, Account No.PR-A-{{doc_number}}
As a result, when invoicing, the document will receive the name:
LLC Company, Account no.PR-A-12
Where “Company LLC” is the company name in Kommo, “12” is the document number.
The integration can also work with products in Kommo.
To insert the products into the document, you need to create a template for the products:
In the product template, we create a table where the first row is the name of the cells, and the second row should contain the masks of the products.
The integration will automatically replace the masks and add as many lines as the items are attached to the transaction card.

In order to insert a product template into the document template, you need to register a mask.:
“Display a list of products as a table" - {{goods.Enter the product template ID}}
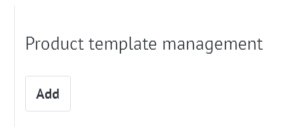
We copy the product template ID from the settings:
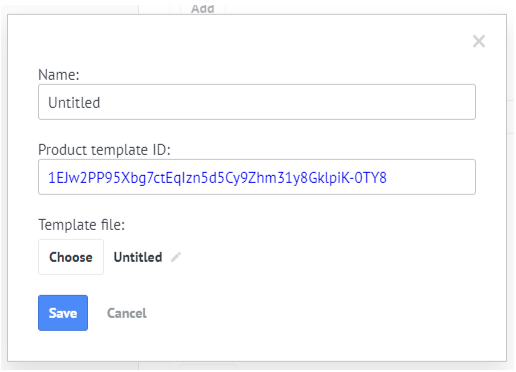
As a result, the document template should have a mask like this:
{{goods.1ZTfEOBLHRRIW6ISKxjOUafKfq1F2Px9OKc3W3KxH11A}}
Template Management:
-Click “Add Template”
-Enter the name of the template. For example, “Contract”
-In the “Last document number” field, specify the number of the last contract (invoice).
For example, the last contract you issued was with the number “PR-A-No. 12". So you need to insert the number 12 in this field. Next, in the template itself, you can specify the mask* {{doc_number}} and your template will have the number 13 (one will be added to the number 12).
*Learn more about masks above
-Select a file from your Google Drive, which will be a template for issuing an agreement (invoice, etc.)
-If necessary, you can specify the managers from whom this template will be hidden.
-Specify the managers who will be able to sign this document.
-Prohibit document management by managers.
Seals:
-Click “Add Print”
- Write the name of the seal. For example, “Seal LLC Company”
-Come up with a mask for printing. You will insert this mask into your template and when the manager clicks on the document signing button, this mask will turn into a signed seal.
Example:
{{print}}
-Select a printed image from your Google Drive. The printed image must be in png or jpg format. The picture must be a suitable size for your document in advance.
Document signature
If you have set up printing and selected managers who can sign the document, then the managers will be able to sign the documents themselves.
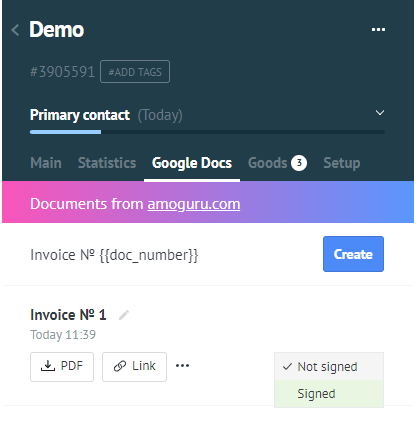
Then, in the transaction, after creating the document, the manager will have the opportunity to sign the document, as shown in the screenshot.
After clicking, the document will be automatically signed and editing of this document will be prohibited.
You can remove the seal from the document.
-Complete the system setup.
-Go to the desired deal.
-Prepare for invoicing (contracts, etc.).
-Check if all necessary fields are filled in.
-If some fields are not filled in, the corresponding masks will be displayed in the document (for example, {{company_name}} ‑ if no company is attached to the transaction).
Go to the Documents tab
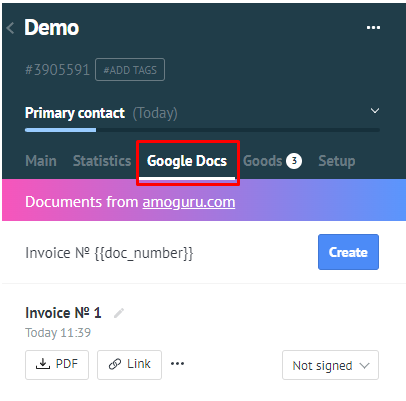
Select a document from the list
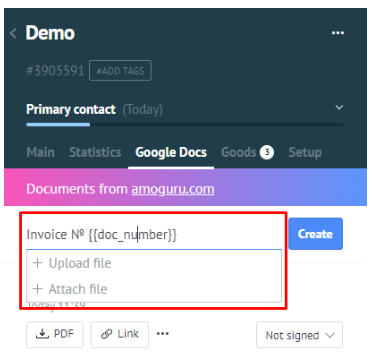
Click on “Create”
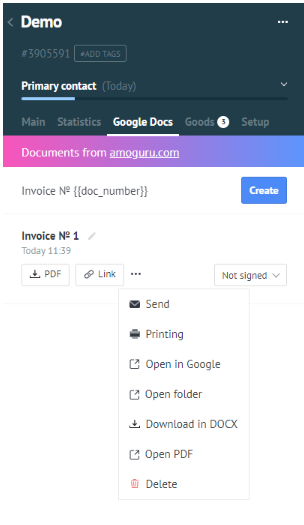
The document will appear after a while. You can click on the title and a window will open where you can view the document itself.
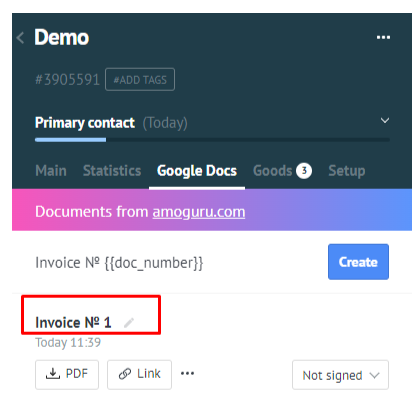
-If you have set up the signature (seal) and you have the rights to sign the documents, then you will have the opportunity to sign the document.
-You can download the document in .pdf format.
-You can delete the document.
-Send by mail or print.
-Open the document itself or the folder in Google.